If you’re re-roofing in Tampa, the underlayment choice is not some boring “extra layer.” It’s the part that keeps water off your wood deck when the storm hits sideways. Steadfast Roofing in Tampa, FL, sees the same pattern over and over: shingles fail quickly when the underlayment system is chosen as an afterthought.
What Roof Underlayment Does in Tampa, FL (When Weather Gets Rude)
Underlayment sits between the roof deck and the roof covering (shingles, tile, metal). In Florida, it’s basically your backup roof. When wind-driven rain gets under shingles, when nails back out, when flashing takes a hit, underlayment is what buys you time and prevents a “small leak” from turning into a ceiling cave-in.
Tampa’s combo platter is what makes this so unforgiving:
- Wind uplift during thunderstorms and hurricanes
- Heavy rain that doesn’t fall down, it travels sideways
- Heat + UV that cooks cheap materials
- Humidity that punishes trapped moisture if the roof can’t breathe properly
Florida code recognizes this reality by requiring approved underlayment systems and, in many cases, by pushing “secondary water barrier” protection options.
The 3 Common Florida Underlayment Install Methods
Most residential roofs in Tampa land in one of these three installation approaches:
- Double synthetic (mechanically fastened)
- Synthetic with seam tape (sealed seams)
- Full peel-and-stick (self-adhered membrane over the whole deck)
They all can work. The “best” depends on roof design, risk areas (valleys, transitions, penetrations), budget, and the level of storm insurance you want built into the system.
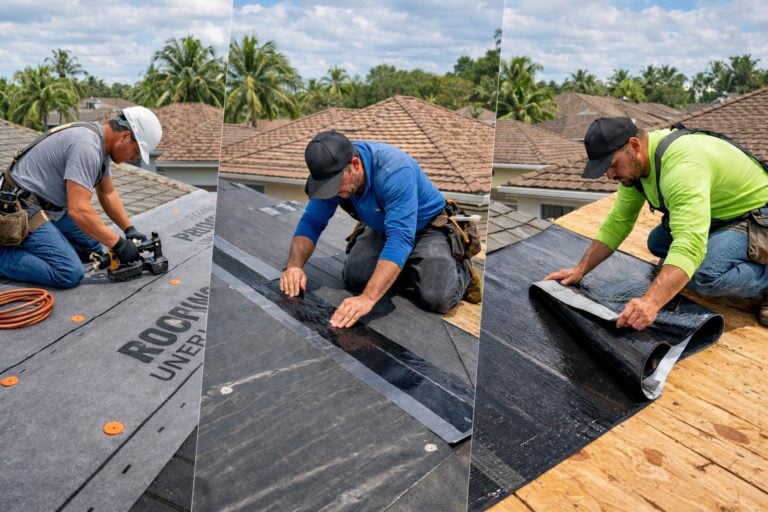
Method 1: Double Synthetic Underlayment (Mechanically Fastened)
This is the classic Florida move for a reason: fast, strong, and cost-effective when installed correctly.
What it is: Two layers of synthetic underlayment installed with proper overlaps and fastened to the deck with approved fasteners (commonly cap nails). Think of it like two rain jackets instead of one. You’re not waterproofing the deck, but you’re making it much harder for water to reach it.
Where it fits best in Tampa:
- Standard shingle roofs with a good slope
- Neighborhoods that see regular summer storms but not constant coastal spray
- Homeowners who want strong protection without going “maximum membrane”
Key install details that matter (a lot):
- Deck prep: Clean, dry, and flat. Underlayment hates splinters, old nails, and warped decking.
- Start at the eave: Work bottom to top so laps shed water naturally.
- Overlap discipline: Horizontal and end laps must be consistent and tight. One sloppy seam becomes the roof’s favorite leak path.
- Fastener choice: Cap nails are common because they resist tear-through better than staples in high wind. Some manufacturers explicitly warn against using staples in this kind of system.
- High-risk zones: Even when the field is double-synthetic, smart installs often reinforce eaves, rakes, valleys, and penetrations.
What it does well:
- Strong wind resistance when fastened correctly
- Good walkability for crews (less tear-prone than felt)
- Easier to repair later than fully-adhered systems
Where it can fail:
- Fastener pattern is too wide, inconsistent, or rushed
- Laps get “close enough” instead of correct
- The roof gets left exposed too long in brutal sun and afternoon downpours
Method 2: Synthetic Underlayment With Seam Tape (Sealed Seams)
This is the upgrade that often prompts homeowners to ask, “Wait… why doesn’t everyone do that?”
What it is: Synthetic underlayment installed across the deck, but with taped seams (and sometimes additional sealing details at transitions). Instead of relying only on overlaps, the system tries to reduce water pathways at seams.
Why seam tape is a big deal in Tampa:
Wind-driven rain doesn’t politely run downhill. It gets pushed sideways and upward. Seams are where water seeks a shortcut. Sealing seams helps the underlayment behave more like a continuous barrier rather than a patchwork of overlapping sheets.
What a good seam-tape install includes:
- Tape compatibility: The tape must bond to the underlayment and withstand heat cycling. Cheap tape loves to peel right when you need it most.
- Dry-surface rule: If the deck or underlayment is damp, tape adhesion drops quickly.
- Roller pressure: Many tapes need firm pressure to fully bond, not just a quick hand swipe.
- Detail work: Valleys, sidewalls, pipe penetrations, skylights, and dead valleys need extra attention. Taping the “easy seams” but ignoring these areas is like locking your front door and leaving the back door wide open.
What it does well:
- Better resistance to wind-driven rain infiltration at seams
- Strong “secondary water barrier” style performance when done as a full system
- Great middle ground between basic synthetic and full peel-and-stick
Where it can fail:
- Wrong tape for the material or wrong prep
- Tape applied in extreme heat without proper technique
- Crews are rushing seams because “the shingles will cover it anyway”
There are also code-recognized approaches that include taping roof deck seams with approved materials in certain assemblies.
Method 3: Full Peel-and-Stick (Self-Adhered Membrane Over the Entire Deck)
This is the “no excuses” underlayment method. It’s also the one that can be overkill in the wrong situation.
What it is: A self-adhered membrane is applied across the entire roof deck. Once it bonds, it creates a far more continuous water-shedding surface than mechanically fastened sheets.
Where full peel-and-stick shines in Tampa:
- Homes with complex rooflines (lots of valleys, transitions, dormers)
- Areas prone to ponding at dead valleys or tricky drainage
- Homeowners who want maximum leak resistance during storm events
- Projects where “secondary water barrier” performance is the goal, not an afterthought
Installation realities homeowners should know:
- Deck condition matters more: Old plywood, splintery edges, or patchy repairs can compromise adhesion.
- Temperature and timing matter: Self-adhered membranes don’t perform well when installed on dirty, wet, or improperly prepared decking.
- It can change how repairs feel later: Removing and reworking a fully adhered system can be more labor-intensive than a mechanically fastened underlayment.
What it does well:
- Excellent water resistance across the field, not just at laps
- Strong protection if shingles blow off during a storm
- Great performance in high-risk roof geometries
Where it can fail (yes, still):
- Poor adhesion due to dust, moisture, or bad prep
- Wrinkles/bridging that create channels for water movement
- Improper integration at flashing and penetrations (the membrane is not magic if details are sloppy)
Tampa Roof Zones That Deserve Extra Underlayment Attention
Even if a homeowner chooses a “standard” method, the best Tampa roofs treat certain areas as if they’re wearing the target.
Eaves and rakes (wind edges):
- Wind tries to lift from the edges first. Underlayment fastening and edge detailing matter.
Valleys:
- Valleys carry concentrated water volume.
- Open valleys, closed-cut valleys, and California valleys all have different failure modes, but underlayment quality is always a significant factor.
Sidewalls, chimneys, and step flashing lines:
- This is where “roofing system” becomes “construction science.” Water loves wall intersections.
Penetrations:
- Pipe boots, exhaust vents, kitchen hoods, skylights. The hole is not the problem. The seal around the hole is the problem.
Quick Comparison: Which Underlayment Method Fits Which Home?
Double synthetic: Best value for many Tampa shingle roofs when installed tightly and fastened correctly.
Synthetic + seam tape: Great for homeowners who want a noticeable upgrade in water resistance without going full membrane.
Full peel-and-stick: Best for complex roofs and high-risk water scenarios, and for homeowners who want the strongest “backup roof” behavior.
If you’re stuck choosing, the simplest way to think about it is: the more your roof design and weather exposure invite water intrusion, the more you benefit from sealing seams or fully adhering the deck coverage.
CONCLUSION
Tampa roofs live in hard mode: heat, humidity, and storms that show up uninvited and leave chaos behind. The underlayment method is the difference between “we’re fine” and “why is there a brown circle on the ceiling?” Double-synthetic is a solid standard when installed correctly; seam-taped synthetic is a smart step up for wind-driven rain; and full peel-and-stick is the maximum-defense option for complex roofs and high-risk areas.
Read our blog: “3 Tips for Choosing the Best Roof for Your Tampa Home”.